

2019–2025 TOYOTA RAV4
RAV4 C2 2.0 and SS3 ditch-light installation guide
Fit the hood-hinge brackets, route the four-pin harness and aim the two lamps. This guide covers C2 2.0 kits DD8803–DD8806 and SS3 kits DD8809–DD8812.
Before you begin
Have 10 mm and 12 mm sockets, a 13 mm wrench, trim-removal tools and a cable fish or pull tool ready. Protect the paint and keep the hood supported and aligned while working at one hinge at a time. Follow the vehicle service instructions for battery isolation and safe electrical work.
Both kits use DD8802 brackets, the DD4093 heavy-duty dual-output four-pin harness and a one-metre switch extension. Use the U-brackets supplied with your specific C2 2.0 or SS3 pods; the photographs show the shared vehicle installation, not identical lamp dimensions.
The main beam is fixed White or Yellow. Amber is a separate accent backlight. The hood brackets use existing fasteners; wiring still runs through a factory firewall grommet to a cabin switch. Check hood, wiper and accessory clearance. Do not use an automatic car wash with the kit installed.
STEP 1 OF 10
Loosen hood hinge bolts
Open the hood. Loosen the two hood-hinge bolts on one side with a 10 mm socket, keeping them engaged rather than removing both bolts.
STEP 2 OF 10
Install hood-mounted ditch light bracket
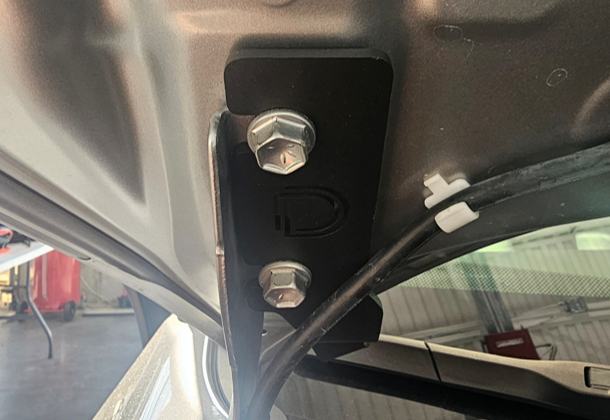
Slide the supplied bracket between the hood hinge and body. Keep the passenger-side washer-fluid line clear of the bracket and bolts.
STEP 3 OF 10
Adjust bracket and secure hood bolts
Position the bracket clear of painted panels. The manufacturer specifies approximately 10 ft-lb for the hood-hinge bolts in this installation; confirm the applicable vehicle service requirement. Repeat the first three steps on the other side.
STEP 4 OF 10
Mount LED pod to bracket
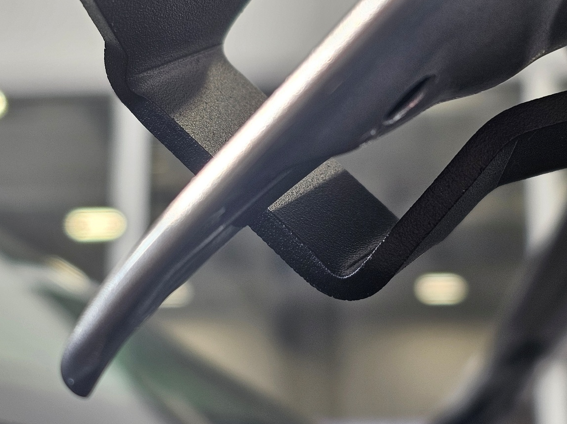
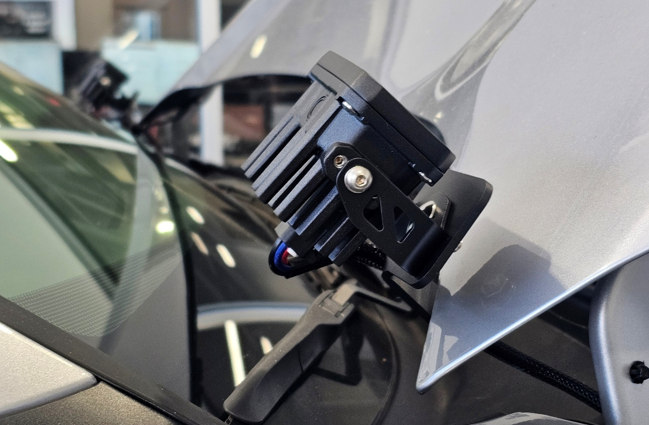
Pass the carriage bolt through the pod U-bracket and vehicle bracket. Use a 13 mm wrench on the hardware, leaving the pod adjustable until final aiming. Use the mounting parts supplied with your chosen pod family.
STEP 5 OF 10
Route wiring into engine bay
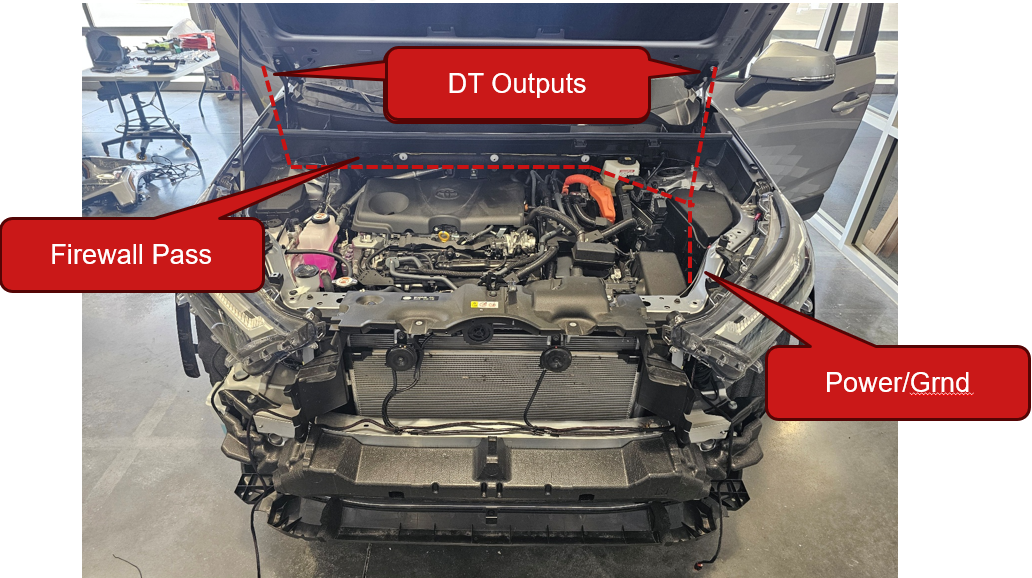
Run the pod leads toward the engine bay and connect the matching sealed harness outputs. Secure the wiring away from sharp edges, moving components and hot parts; leave enough slack for hood movement.
STEP 6 OF 10
Connect power and ground
Use the battery or designated power post for the fused harness power connection. On hybrid models, the manufacturer directs power to the fuse-box power post. Use the factory ground point near the driver-side headlamp shown in the original diagram. Identify the correct points for your vehicle before connecting.
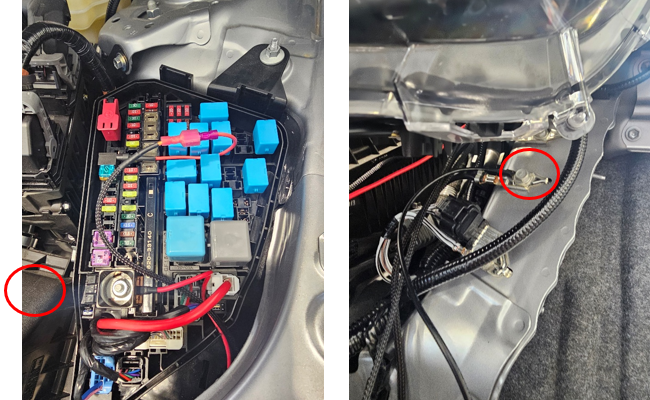
STEP 7 OF 10
Route switch wiring through firewall
Pass the switch wiring through a factory firewall grommet using a cable fish or pull tool as needed. Preserve the grommet seal and protect the wiring from abrasion.
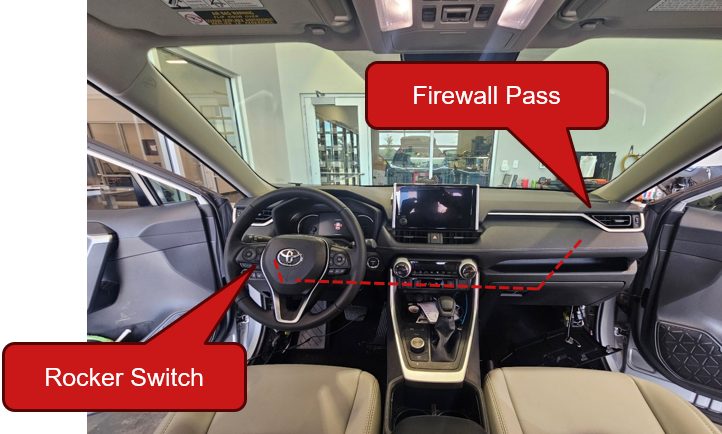
STEP 8 OF 10
Route wiring to switch location
Route the switch lead across the dash toward the chosen location. Use the included extension where the route requires additional length, and secure the wiring clear of pedals and moving controls.
STEP 9 OF 10
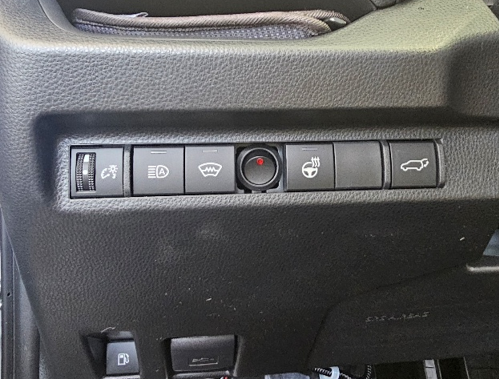
Mount rocker switch
Fit the three-position switch to a suitable factory switch blank or other appropriate mounting location. The original photograph shows the switch installation; use the switch and connector supplied with your harness.
STEP 10 OF 10
Test function and aim lights
Restore the vehicle connections safely, switch the ignition on as instructed and test the main lights and amber backlights separately. Aim for useful off-road coverage without shining across the hood or into other road users’ eyes. Tighten the pod hardware and check full hood travel and wiring clearance.
Watch the manufacturer’s RAV4 walkthrough
The overview demonstrates the shared mounting position and lighting choices. Follow the current written steps and use the parts supplied with your kit.
Original reference and kit choices
Original manufacturer installation article
Choose the compact C2 2.0 kit · Choose the SS3 kit · Browse vehicle-specific lighting kits