

BTS installation guide
Install Elite Type B fog lights on a 2012–2023 Tacoma
Replace the original fog-light pair, connect the separate accent circuit if wanted, and finish by setting the cutoff on a wall.
Match the truck and the lamps
This guide covers the listed Tacoma factory-fog application. It excludes Tacoma TRD Pro. Match the original mounts and connectors before removing anything. Keep the factory hardware organised, protect the surrounding trim, and use the correct vehicle service information for access and fastener torque.
Trucks without factory fog lamps require additional wiring and mounting assessment before installation.
Step 1
Reach the original fog lamp
Access the lamp from above near the headlight or by opening the wheel-liner access, as appropriate for the truck.
Step 2
Remove the factory assembly
Unplug the fog connector and remove the original lamp. Retain its fasteners for reuse.
Step 3
Fit the correct Elite lamp
Check any left/right marking on the housing. Align the Type B mounting tabs with the original mounting points and secure it with the retained factory hardware.
Step 4
Connect and test the main beam
Fit the included wiring adapter and test the lamp. If it does not illuminate, turn the circuit off and check the polarity; the manufacturer directs reversing the vehicle connector 180 degrees when needed.
Step 5
Connect the optional backlight
Connect the optional amber backlight to a suitable fused 12V source, such as the manufacturer-specified parking or marker circuit. Do not connect directly to the battery. Confirm the circuit and connector position on the actual vehicle, then secure the wiring away from heat, edges and moving parts.
Optional Tacoma backlight harness: DD4134 can provide an inline connection on compatible 2016–2023 Tacoma headlight connectors. It does not fit factory OEM LED headlights, and some halogen headlight assemblies also lack the required connector. Compare the original connector before adding it. The main fog beam and the amber accent backlight are separate circuits.
Step 6
Complete the other side
Repeat the access, mounting and connection work on the other lamp. Test both main beams and the optional backlights before closing the access panels.
Aim at 25 feet
- Park on level ground 25 feet from a wall or garage door.
- Measure from the ground to the centre of each fog lamp.
- Mark that mounting height on the wall.
- Add the cutoff mark four inches below it.
- Use the integrated lamp adjuster to place the top of each fog beam at the lower mark.
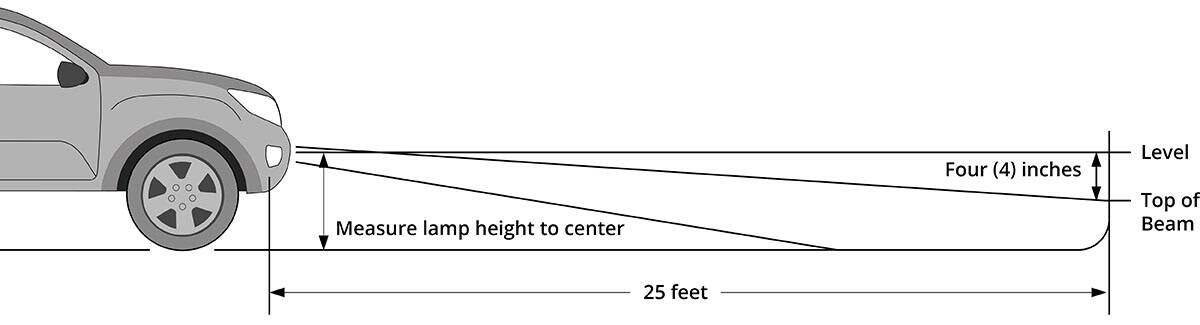
Use the Elite integrated adjuster for this lamp; the generic video does not replace the vehicle fitment check.
Only Dual Color lamps use SmartSelect
DD5185P can select White or Yellow. DD5134P and DD5137P are fixed-colour lamps and skip programming.
Parts and original instructions
Shop Elite Type B pairs · Original manufacturer installation article